

There’s something magical about working with 48 hour pizza dough-the kind of dough that transforms a simple homemade pizza into an artisan masterpiece.
This cold fermented pizza dough recipe delivers the complex flavours, airy texture, and perfectly charred crust that pizza enthusiasts dream about.
Whether you’re a seasoned home baker or just learning how to make 48 hour pizza dough, this slow fermentation method creates an incredibly flavourful base that rivals your favourite pizzeria.
The 2 day pizza dough process may require patience, but the spectacular results are absolutely worth the wait.
What is 48 Hour Pizza Dough and How Does It Taste?
48 hour cold ferment pizza dough is a slow-fermented dough that rests in the refrigerator for two full days, allowing natural enzymes and minimal yeast to develop extraordinary depth of flavour. This extended cold fermentation process breaks down gluten proteins, creating a dough that’s easier to digest and stretch.

The taste is remarkably complex-subtly tangy with hints of sourdough-like flavour, beautifully balanced between sweet and savoury notes. When baked, this 48 hour pizza dough produces a crust with crispy, blistered edges and a tender, airy interior with those coveted leopard-spotted char marks.
The texture is chewy yet light, with an open crumb structure full of irregular air pockets that professional pizzaiolos strive for.
48 Hour Pizza Dough Recipe Ingredients
For 6 dough balls (260g each):
- 1kg tipo ’00’ flour (Caputo Saccharose recommended)
- 680ml room temperature water
- 0.5g dry yeast
- 26g salt (Celtic salt or fine sea salt)
- 10g extra virgin olive oil
Kitchen Utensils
- Large mixing bowl
- Kitchen scale (for precise measurements)
- Bench scraper or dough cutter
- Plastic wrap or kitchen towel
- Airtight dough boxes or sealed containers
- Stand mixer (optional, but helpful)
Preparation and Cooking Time
Prep time: 30 minutes (active kneading and shaping)
First fermentation: 12 hours at room temperature
Cold fermentation: 34 hours in refrigerator
Final rest: 2 hours at room temperature
Total time: 48 hours
Baking time: 8-12 minutes per pizza
Servings: 6 pizzas (260g dough balls)
48 Hour Pizza Dough Recipe Instructions
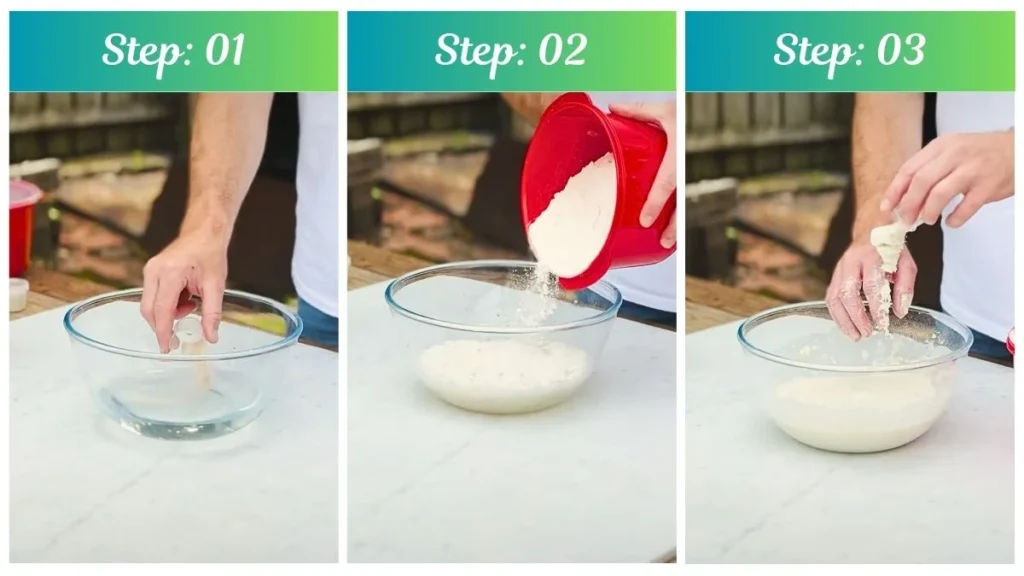
Step 1: Mixing the Ingredients
Pour the room temperature water into your mixing bowl. Sprinkle the dry yeast over the water and stir gently until completely dissolved. Add approximately one-quarter of your tipo ’00’ flour to the water-yeast mixture and combine thoroughly. Next, add the salt directly to this mixture and stir until fully dissolved into the wet ingredients. Gradually incorporate the remaining flour in small additions, mixing continuously until all the flour has absorbed the water and no dry pockets remain. While the dough is still in the mixing bowl, drizzle the extra virgin olive oil over the surface and work it into the dough by hand or with a spatula. Once the oil is fully incorporated, transfer the shaggy dough mass onto your clean work surface.
Step 2: Kneading for Structure and Strength
Knead the dough vigorously for 10-12 minutes using the push-fold-turn method until it becomes smooth, elastic, and slightly tacky to the touch. The dough should spring back when gently pressed. After this initial kneading session, cover the dough with a damp kitchen towel or plastic wrap and allow it to rest for 15 minutes-this rest period relaxes the gluten network. Following this brief rest, perform 4-5 lift-and-fold techniques: lift one edge of the dough, stretch it upward, then fold it over the center, rotating the dough 90 degrees between each fold. This creates surface tension and forms a tight, smooth, elastic ball. Return the shaped dough to your lightly oiled bowl, cover completely with plastic wrap, and let it rest at room temperature (ideally 68-72°F) for a full 12-hour bulk fermentation.
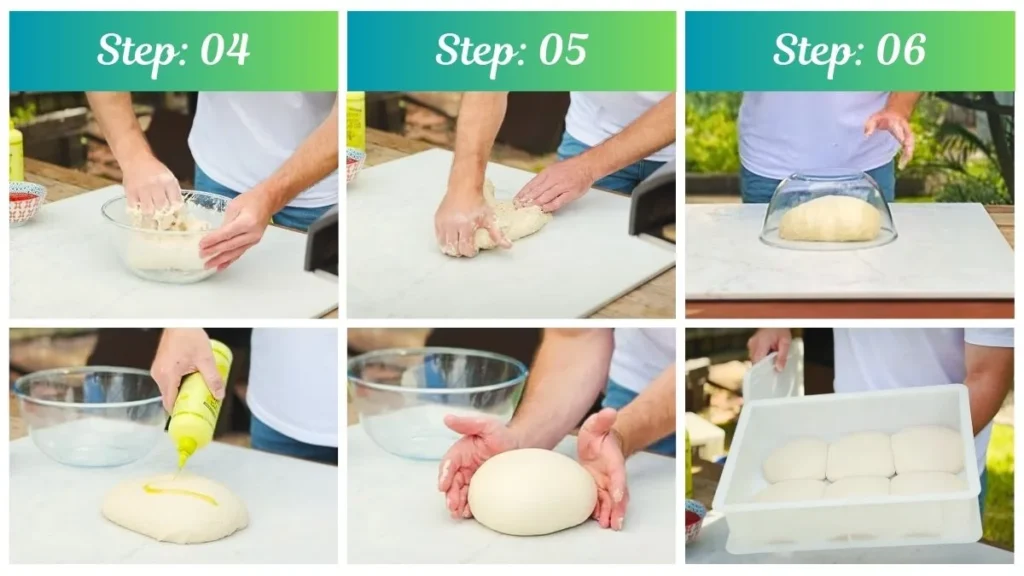
Step 3: Dividing and Balling the Dough
After the 12-hour room temperature fermentation, your dough should have noticeably increased in volume and developed air bubbles. Turn the dough out onto a lightly floured work surface and divide it into 6 equal portions, each weighing approximately 250-260 grams. Shape each portion into a tight ball by cupping your hand over the dough and using circular motions against the work surface to create tension on the surface. Place each dough ball into individual compartments of a dough box or into separate airtight containers lightly brushed with olive oil to prevent sticking. Seal the containers completely and transfer them to your refrigerator for a 34-hour cold fermentation period where the magic truly happens.
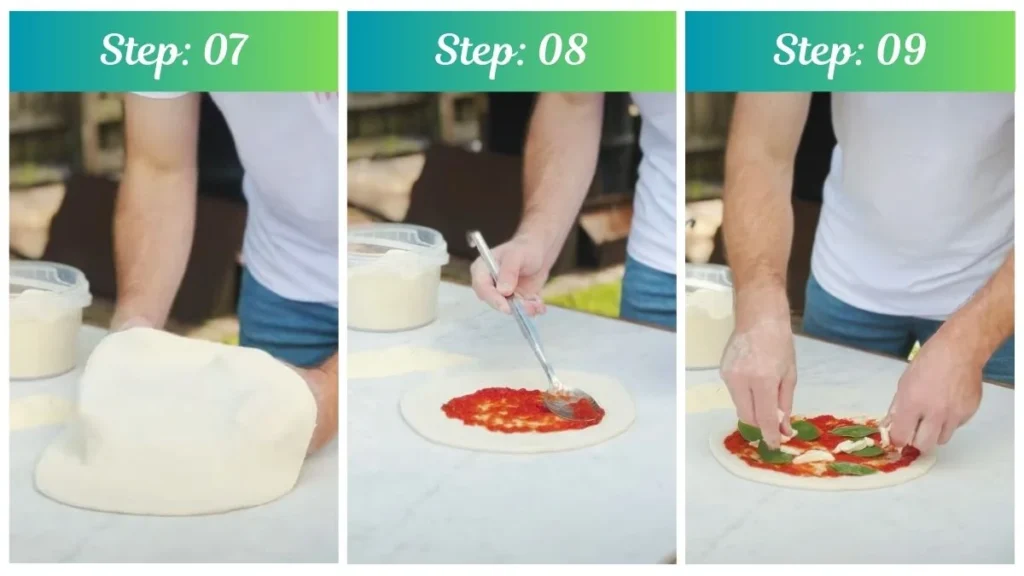
Step 4: Final Rest and Pizza Making
Remove your dough balls from the refrigerator exactly 2 hours before you plan to bake-this allows them to come to room temperature and become extensible for easy stretching. Preheat your oven to 400-450°F (or as hot as your oven will safely go; pizza ovens reach 800-900°F). Generously flour your work surface and gently turn out one dough ball. Using your fingertips, press from the centre outward, leaving a slightly thicker border for the crust. Stretch the dough carefully, allowing gravity to help, until you achieve your desired thickness.

Top with your favourite sauce, cheese, and toppings, then bake until the crust is golden and beautifully charred, creating a spectacular pizza to share with friends and family.
Customization and Pairing Ideas for Your 48 Hour Pizza Dough
1. Classic Margherita Perfection
The simplicity of this cold fermented pizza dough shines brightest when topped with San Marzano tomato sauce, fresh mozzarella di bufala, basil leaves, and a drizzle of high-quality extra virgin olive oil. The clean flavours allow the complex, slightly tangy notes of your fermented dough to take center stage.
2. White Pizza Elegance
Skip the tomato sauce entirely and brush your stretched dough with garlic-infused olive oil, then top with ricotta, mozzarella, parmesan, and fresh herbs like rosemary or thyme. The creamy cheese combination complements the nuanced flavours developed during the 48-hour fermentation beautifully.
3. Whole Wheat or Multigrain Variation
Substitute 20-30% of the tipo ’00’ flour with whole wheat or bread flour for a nuttier, heartier crust. This works wonderfully with robust toppings like caramelized onions, mushrooms, and aged cheeses that can stand up to the earthier dough flavour.
4. Honey and Hot Pepper Balance
After baking, finish your pizza with a drizzle of hot honey and crushed red pepper flakes over pepperoni or soppressata. The sweet-spicy contrast plays beautifully against the subtle tanginess of the 2 day pizza dough.
5. Seasonal Vegetable Showcase
Top your fermented dough with seasonal vegetables-spring asparagus and peas, summer heirloom tomatoes and zucchini, fall butternut squash and sage, or winter Brussels sprouts and pancetta. The superior crust quality elevates simple, fresh ingredients.
6. Detroit-Style Deep Dish Adaptation
Press your 48 hour cold ferment pizza dough into an oiled rectangular pan, creating a thicker, focaccia-like base. Top edge-to-edge with cheese (especially brick cheese if available), add sauce on top, and bake until crispy and caramelized around the edges.

7. Breakfast Pizza Innovation
Use your cold-fermented base for a morning treat topped with scrambled eggs, crispy bacon or sausage, caramelized onions, and a blend of cheddar and mozzarella. The digestible, flavourful crust makes for an unexpectedly sophisticated breakfast option.
Expert Tips for Perfect 48 Hour Pizza Dough Recipe
1. Temperature Control is Critical
The success of your 48 hour pizza dough recipe depends heavily on maintaining proper temperatures throughout fermentation. Your bulk fermentation should occur at 68-72°F-too warm and the dough over-ferments, too cold and it won’t develop properly. Your refrigerator should be between 38-40°F for optimal cold fermentation that develops flavour without over-proofing.
2. Use Minimal Yeast for Maximum Flavour
The remarkably small amount of yeast (just 0.5g for 1kg of flour) is intentional and crucial. This minimal yeast allows for slow, controlled fermentation that develops complex flavours and improved digestibility. Don’t be tempted to add more yeast thinking it will help-it will actually diminish the characteristics that make cold fermented pizza dough so special.
3. Invest in Quality Tipo ’00’ Flour
While you can use bread flour in a pinch, authentic tipo ’00’ flour like Caputo makes a noticeable difference in texture and extensibility. This finely milled Italian flour has the ideal protein content (around 12-13%) for pizza dough that stretches easily without tearing and bakes with that characteristic tender-yet-chewy texture.
4. Don’t Skip the Kneading
Proper kneading develops the gluten network essential for a stretchy, elastic dough. If you’re hand-kneading, the full 10-12 minutes is necessary-your dough should transform from shaggy and rough to smooth and supple. The windowpane test (stretching a small piece until thin enough to see light through) confirms adequate gluten development.
5. Watch for Over-Fermentation Signs
While learning how to make 48 hour pizza dough, watch for signs of over-fermentation: excessive spreading, a very strong alcohol smell, or dough that deflates when touched. If your kitchen runs warm, you may need to reduce the room temperature fermentation time or move to refrigeration earlier.
6. Handle Gently After Cold Fermentation
When removing your dough balls from the refrigerator, handle them with care. The gluten network is delicate after extended fermentation. Rough handling can deflate the air pockets you’ve worked so hard to develop. Use plenty of flour when stretching and work from the centre outward with gentle, patient movements.
7. Preheat Your Baking Surface Thoroughly
Whether using a pizza stone, steel, or inverted baking sheet, preheat it for at least 45-60 minutes at maximum temperature. A properly preheated surface provides the intense bottom heat necessary to achieve the crispy, charred crust that makes 48 hour cold ferment pizza dough so exceptional. This high heat also promotes rapid oven spring and those desirable leopard spots.
Storage and Reheating Guidance
Store unbaked dough balls in airtight containers in the refrigerator for up to 5 days, though optimal flavour peaks at 48-72 hours. For longer storage, freeze individual balls wrapped tightly in plastic wrap for up to 3 months; thaw overnight in the refrigerator before the final 2-hour room temperature rest.
48 Hour Pizza Dough Recipe

There’s something magical about working with 48 hour pizza dough-the kind of dough that transforms a simple homemade pizza into an artisan masterpiece.
Ingredients
- 1kg tipo ’00’ flour
- 680ml room temperature water
- 0.5g dry yeast
- 26g salt
- 10g extra virgin olive oil
Instructions
Step 1: Mixing the Ingredients
Pour the room temperature water into your mixing bowl. Sprinkle the dry yeast over the water and stir gently until completely dissolved. Add approximately one-quarter of your tipo ’00’ flour to the water-yeast mixture and combine thoroughly. Next, add the salt directly to this mixture and stir until fully dissolved into the wet ingredients. Gradually incorporate the remaining flour in small additions, mixing continuously until all the flour has absorbed the water and no dry pockets remain. While the dough is still in the mixing bowl, drizzle the extra virgin olive oil over the surface and work it into the dough by hand or with a spatula. Once the oil is fully incorporated, transfer the shaggy dough mass onto your clean work surface.
Step 2: Kneading for Structure and Strength
Knead the dough vigorously for 10-12 minutes using the push-fold-turn method until it becomes smooth, elastic, and slightly tacky to the touch. The dough should spring back when gently pressed. After this initial kneading session, cover the dough with a damp kitchen towel or plastic wrap and allow it to rest for 15 minutes-this rest period relaxes the gluten network. Following this brief rest, perform 4-5 lift-and-fold techniques: lift one edge of the dough, stretch it upward, then fold it over the center, rotating the dough 90 degrees between each fold. This creates surface tension and forms a tight, smooth, elastic ball. Return the shaped dough to your lightly oiled bowl, cover completely with plastic wrap, and let it rest at room temperature (ideally 68-72°F) for a full 12-hour bulk fermentation.
Step 3: Dividing and Balling the Dough
After the 12-hour room temperature fermentation, your dough should have noticeably increased in volume and developed air bubbles. Turn the dough out onto a lightly floured work surface and divide it into 6 equal portions, each weighing approximately 250-260 grams. Shape each portion into a tight ball by cupping your hand over the dough and using circular motions against the work surface to create tension on the surface. Place each dough ball into individual compartments of a dough box or into separate airtight containers lightly brushed with olive oil to prevent sticking. Seal the containers completely and transfer them to your refrigerator for a 34-hour cold fermentation period where the magic truly happens.
Step 4: Final Rest and Pizza Making
Remove your dough balls from the refrigerator exactly 2 hours before you plan to bake-this allows them to come to room temperature and become extensible for easy stretching. Preheat your oven to 400-450°F (or as hot as your oven will safely go; pizza ovens reach 800-900°F). Generously flour your work surface and gently turn out one dough ball. Using your fingertips, press from the centre outward, leaving a slightly thicker border for the crust. Stretch the dough carefully, allowing gravity to help, until you achieve your desired thickness. Top with your favourite sauce, cheese, and toppings, then bake until the crust is golden and beautifully charred, creating a spectacular pizza to share with friends and family.
Notes
Store unbaked dough balls in airtight containers in the refrigerator for up to 5 days, though optimal flavor peaks at 48-72 hours. For longer storage, freeze individual balls wrapped tightly in plastic wrap for up to 3 months; thaw overnight in the refrigerator before the final 2-hour room temperature rest.
Nutrition Information:
Yield:
8Serving Size:
1Amount Per Serving: Calories: 200
Common Queries and FAQs
When you give this 48 Hour Pizza Dough Recipe a try, you might have a few questions. Don’t worry-we’ve rounded up answers to the most common ones to help you out.
Q: Can I reduce the fermentation time if I’m in a hurry?
A: While you can shorten the process, you’ll sacrifice the complex flavours and superior texture that make 48 hour pizza dough special. If pressed for time, consider a same-day recipe with more yeast instead-rushing this recipe won’t give you the intended results.
Q: Why is my dough not rising during the bulk fermentation?
A: Check your yeast freshness first, and ensure your water wasn’t too hot (which kills yeast) or too cold (which prevents activation). Also verify your room temperature is between 68-72°F-significantly cooler temperatures will dramatically slow fermentation.
Q: Can I use active dry yeast instead of instant yeast?
A: Yes, but active dry yeast should be bloomed in the warm water for 5-10 minutes before adding flour. The amount remains the same at 0.5g for this cold fermented pizza dough recipe.
Q: My dough tears when I try to stretch it-what am I doing wrong? A: This usually means the dough hasn’t come to proper room temperature after refrigeration. Ensure the full 2-hour rest period, and if your kitchen is cool, you may need an extra 30 minutes. Also, use more flour on your work surface and stretch very gently.
Q: How do I know when my dough has fermented long enough?
A: After the 12-hour bulk fermentation, the dough should have roughly doubled in size with visible air bubbles throughout. After the 34-hour cold fermentation, the dough balls should look puffy and feel light. They should spring back slowly when gently pressed.
Q: Can I bake this pizza in a regular home oven?
A: Absolutely! While professional pizza ovens reach 800-900°F, home ovens at 450-500°F (or as high as yours safely goes) still produce excellent results with 2 day pizza dough. Using a preheated pizza stone or steel helps compensate for the lower temperature.
Q: What’s the difference between this and same-day pizza dough?
A: Same-day doughs use significantly more yeast and warmer temperatures for rapid fermentation. The 48 hour cold ferment pizza dough method uses minimal yeast and cold temperatures to slowly develop enzymes that create complex flavors, improved digestibility, and superior texture that simply can’t be rushed.
Mastering this 48 hour pizza dough recipe transforms your home pizza-making from ordinary to extraordinary. The patience required for proper cold fermentation pays dividends in every bite-complex flavours, perfect texture, and that authentic pizzeria-quality crust you’ve been chasing.
Whether you’re crafting a classic Margherita or experimenting with creative toppings, this cold fermented pizza dough provides the ideal foundation. The process may span two days, but the active work is minimal, making this approachable even for beginners ready to elevate their pizza game to professional standards.
We’d love to hear how this recipe turns out for you! Give it a try, then drop a comment below to share your thoughts and tips with us. You can also follow us on Pinterest, and YouTube for more delicious updates and kitchen inspiration. Your feedback and support mean the world to us!