

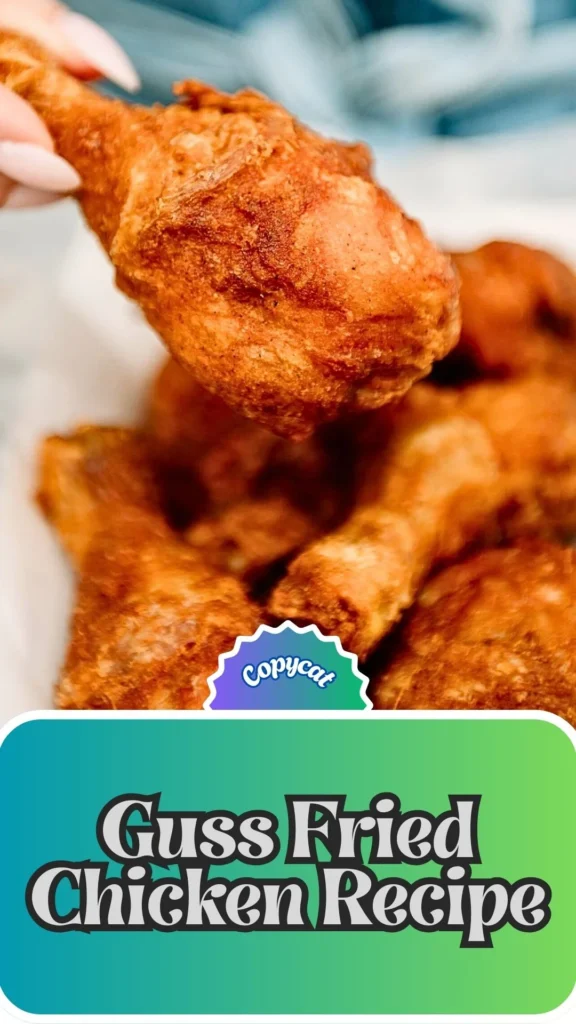
If you’ve ever tasted the legendary crunch of Gus’s World Famous Fried Chicken and wondered how to recreate that irresistible flavor at home, you’re in the right place. This copycat Guss fried chicken recipe delivers that signature golden-brown crust, juicy tender meat, and perfectly balanced seasoning that made the Memphis original a cult favorite.
Learning how to make Guss fried chicken isn’t just about frying-it’s about mastering the buttermilk brine, the double-dredge technique, and the precise frying method that creates restaurant-quality crispy fried chicken right in your kitchen.
Whether you’re a fried chicken enthusiast or simply craving that iconic taste, this best fried chicken recipe will become your go-to for Sunday dinners, game day gatherings, and any occasion that calls for seriously good comfort food.
What Does It Taste Like?
This Gus’s fried chicken copycat recipe captures the essence of the original with its ultra-crispy, shatteringly crunchy exterior that gives way to incredibly moist, flavorful meat.

The buttermilk brine infuses every bite with tenderness while the seasoned coating delivers a perfect balance of savory, slightly spicy, and aromatic notes from paprika, cayenne, and poultry seasoning. Unlike heavy, greasy fried chicken, this version stays light and crisp with a golden-brown color that’s as beautiful as it is delicious.
The hot sauce in the marinade adds subtle tanginess without overwhelming heat, while the garlic and onion create depth that makes each piece utterly craveable and memorable.
Guss Fried Chicken Recipe Ingredients and Kitchen Utensils
Ingredients
The Buttermilk Brine:
- 8–10 pieces of chicken (drumsticks, thighs, wings, or mixed; about 3–4 lbs / 1.5–2 kg total)
- 2 cups (480 ml) buttermilk
- 1 medium yellow onion, sliced or roughly chopped
- 3–4 garlic cloves, smashed or minced
- 1–2 tablespoons salt (kosher or table salt)
- 2–3 tablespoons hot sauce (Frank’s RedHot or similar)
Seasoning the Chicken:
- 1 teaspoon paprika
- ½–1 teaspoon cayenne pepper
- 1 teaspoon poultry seasoning
- 1 teaspoon onion powder
- 1 teaspoon garlic powder
- 1 teaspoon salt
- ½–1 teaspoon black pepper
For the Seasoned Flour:
- 2–3 cups self-rising flour
- Same seasoning mix as above (duplicated for the coating)
The Egg Wash:
- 1 large egg
- 3 tablespoons water
For Frying:
- Neutral oil with high smoke point (vegetable, canola, or peanut oil; enough for 2–3 inches depth)
Kitchen Utensils
- Large mixing bowl or zip-top bag (for brining)
- Paper towels
- Small bowl (for mixing seasonings)
- 2 shallow dishes or bowls (for flour and egg wash)
- Deep pot, Dutch oven, or deep fryer
- Cooking thermometer (for oil and meat temperature)
- Wire rack over baking sheet
- Tongs or slotted spoon
Preparation and Cooking Time
Prep Time: 20 minutes (plus 4–24 hours brining)
Cook Time: 15–18 minutes per batch
Total Time: 4 hours 35 minutes to 24 hours 40 minutes
Servings: 4–5 people
Copycat Guss Fried Chicken Recipe
Step 1: Brine the Chicken
Place your chicken pieces in a large bowl or zip-top bag. Pour in the buttermilk, then add the sliced onion, smashed garlic cloves, salt, and hot sauce. Mix thoroughly to ensure every piece is coated. Cover and refrigerate for at least 4 hours, though overnight (up to 24 hours) yields maximum tenderness and flavor penetration.
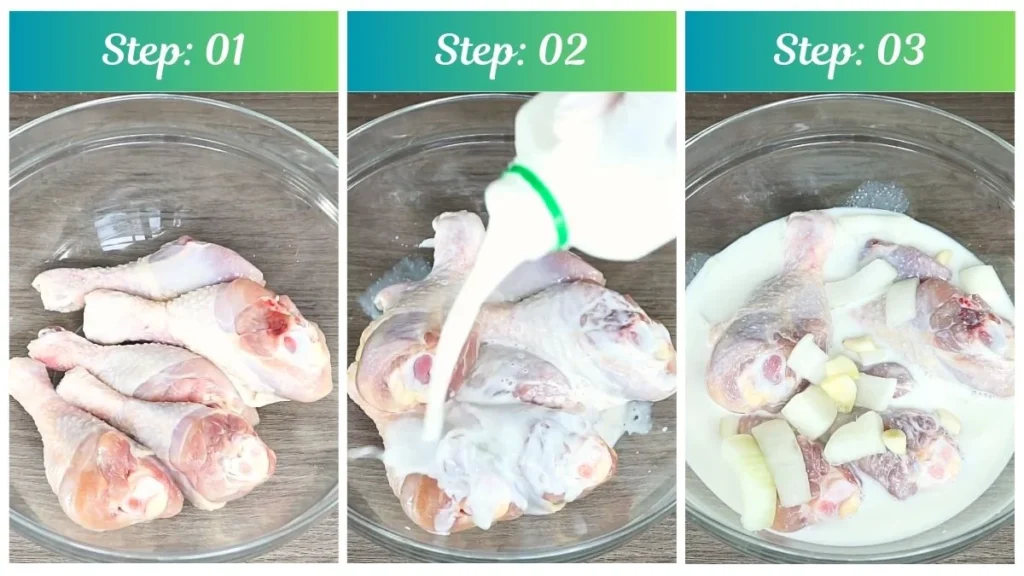
Step 2: Remove and Dry
Take the chicken out of the buttermilk brine and discard the liquid along with the onion and garlic. Pat each piece completely dry with paper towels-removing moisture is critical for achieving that coveted crispy exterior. Let the chicken sit at room temperature for about 10 minutes to take the chill off.
Step 3: Season the Chicken
Combine paprika, cayenne pepper, poultry seasoning, onion powder, garlic powder, salt, and black pepper in a small bowl. Generously sprinkle and rub this seasoning blend all over each chicken piece, ensuring even coverage. Allow the seasoned chicken to rest at room temperature for another 10 minutes.
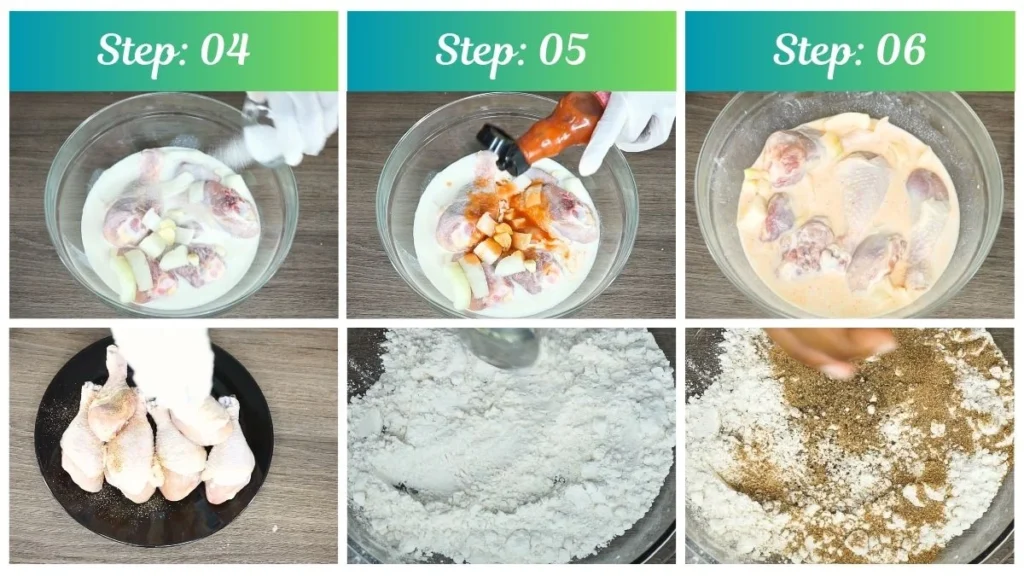
Step 4: Prepare the Dredging Station
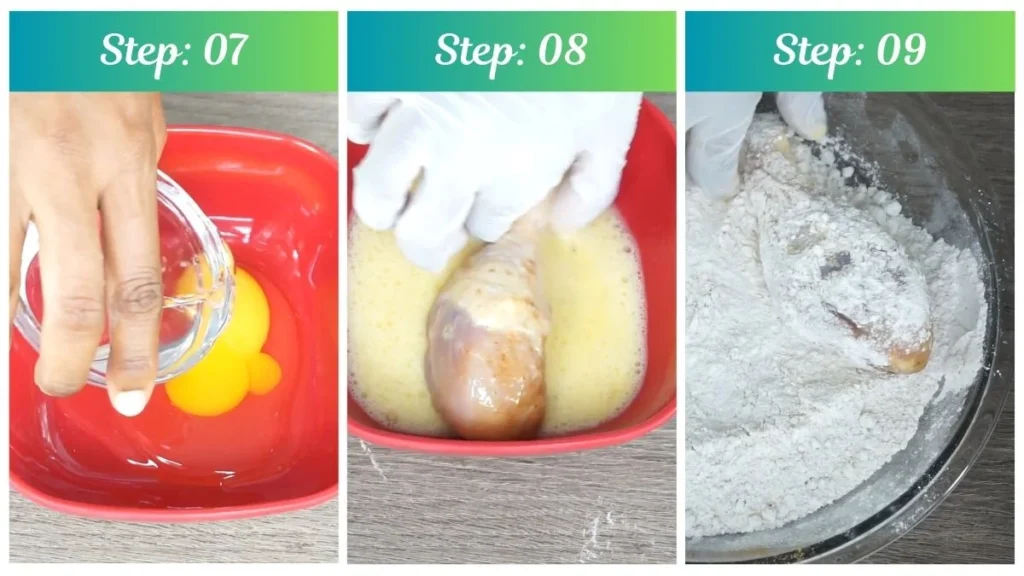
Add self-rising flour to a large shallow dish and mix in the same seasoning blend you used on the chicken. Taste a small pinch to confirm it’s well-seasoned-it should be flavorful, not bland. In a separate bowl, whisk together the egg and water until completely smooth.
Step 5: Double Dredge for Maximum Crispiness
Dip one seasoned chicken piece into the egg wash, letting excess drip off. Immediately coat it thoroughly in the seasoned flour, pressing and squeezing the flour onto the chicken with your hands. For extra crunch, dip the floured piece back into the egg wash, then back into the flour, pressing firmly to create a thick, craggy coating. Place on a plate or rack and repeat with remaining pieces. Let rest for 5 minutes-the coating should look slightly wet and sticky.
Step 6: Heat the Oil
Pour oil into your deep pot or Dutch oven to a depth of 2–3 inches. Heat to exactly 350°F (175°C), monitoring with a thermometer. Maintaining this temperature is the secret to crispy fried chicken like Guss.
Step 7: Fry in Batches
Carefully lower chicken pieces into the hot oil without overcrowding-fry in batches if necessary. Cook drumsticks and wings for 12–15 minutes, thighs and breasts for 15–18 minutes, turning occasionally for even browning. The internal temperature should reach 165°F (74°C) in the thickest part.
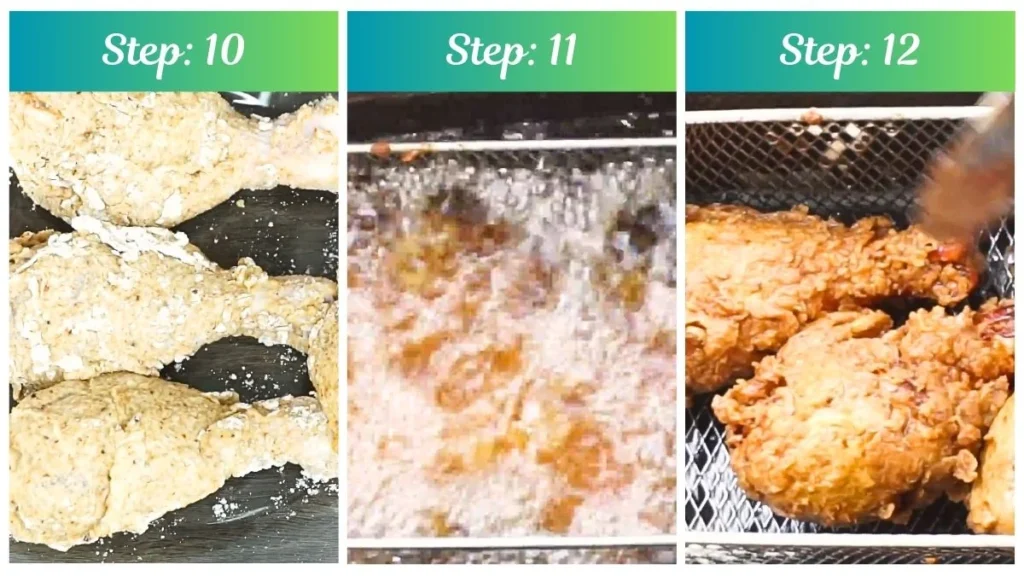
Step 8: Drain and Rest
Remove finished pieces to a wire rack over a baking sheet (or paper towels) to drain. Let rest 5–10 minutes before serving to maintain maximum crispiness.
Customization and Pairing Ideas for Serving
1. Spice Level Variations
Adjust the cayenne pepper in your seasoning mix to control heat intensity. For mild fried chicken like Guss recipe, use just ½ teaspoon cayenne or omit it entirely. Heat lovers can double it to 2 teaspoons or add a pinch of ghost pepper powder for serious kick. You can also vary the hot sauce in the brine from 2 tablespoons for subtle tang to 4 tablespoons for bolder flavor.
2. Classic Southern Sides
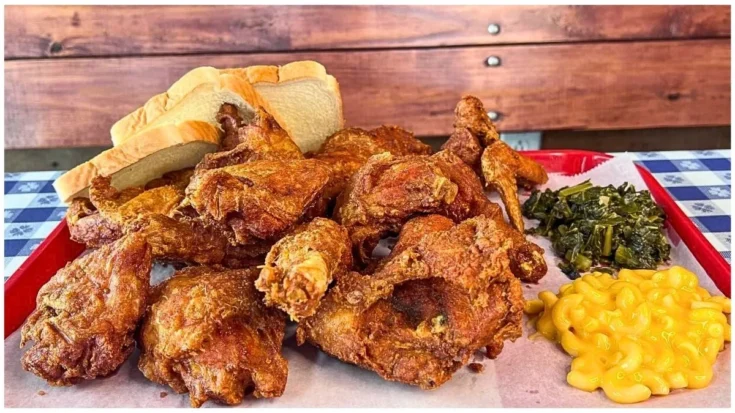
Pair your Gus’s chicken recipe with traditional soul food accompaniments like creamy coleslaw, mac and cheese, collard greens, cornbread, and baked beans. The cooling crunch of coleslaw perfectly complements the hot, crispy chicken, while mac and cheese adds comforting richness that balances the seasoned coating.
3. Sandwich Transformation
Turn your copycat Gus’s fried chicken into incredible sandwiches by placing a piece between buttered, toasted brioche buns with pickles, shredded lettuce, tomato, and spicy mayo or comeback sauce. This creates a restaurant-quality chicken sandwich that rivals any fast-food chain.
4. Waffle Pairing
Create the ultimate chicken and waffles experience by serving your crispy fried chicken atop fluffy Belgian waffles drizzled with maple syrup and a pat of butter. The sweet-savory combination is an American classic that showcases the versatility of this best fried chicken recipe.
5. Fresh Summer Sides
During warmer months, serve alongside lighter accompaniments like cucumber tomato salad, watermelon slices, corn on the cob, or potato salad. These refreshing sides provide contrast to the rich, savory fried chicken while keeping the meal from feeling too heavy.
6. International Fusion
Give your Gus fried chicken recipe global flair by serving with Asian-inspired sides like kimchi, sesame cucumber salad, or jasmine rice. You could also create tacos with shredded fried chicken, cabbage slaw, cilantro, and sriracha mayo for a Mexican fusion twist.
7. Dipping Sauce Selection
Elevate the eating experience with an array of dipping sauces-honey mustard, ranch dressing, buffalo sauce, garlic aioli, comeback sauce, or hot honey. Each sauce adds a different flavor dimension and lets diners customize their experience with every bite of your perfectly crispy creation.
Essential Tips for Perfect Results
1. The Brine Makes All the Difference
Never skip the buttermilk brining step in this Gus’s fried chicken copycat recipe. The acidic buttermilk breaks down tough proteins, making the meat incredibly tender while infusing flavor deep into every fiber. The minimum 4-hour brine is acceptable, but overnight brining (12–24 hours) produces noticeably juicier, more flavorful results. The hot sauce in the brine isn’t primarily for heat-it adds tanginess and further tenderizes the meat through its vinegar content.
2. Dryness is Critical
After removing chicken from the brine, pat each piece absolutely dry with paper towels. Excess moisture prevents the coating from adhering properly and creates steam during frying, which makes the crust soggy rather than crispy. This single step is often overlooked but represents one of the true secrets to crispy fried chicken like Guss. Take your time and use multiple paper towels if needed.
3. Self-Rising Flour is Non-Negotiable
The self-rising flour called for in this copycat Guss fried chicken recipe contains leavening agents that create the signature light, fluffy, ultra-crispy texture. Regular all-purpose flour produces a denser, harder crust that lacks that shatterable crunch. If you absolutely must substitute, add 1½ teaspoons baking powder and ½ teaspoon salt per cup of all-purpose flour, but self-rising is always best.
4. Temperature Control is Everything
Maintain your frying oil at a steady 350°F (175°C) throughout cooking. Too hot (above 375°F) and the exterior burns before the inside cooks through; too cool (below 325°F) and the chicken absorbs excess oil, becoming greasy rather than crispy. Invest in a good thermometer and adjust your heat between batches. The oil temperature will drop when you add chicken, so don’t overcrowd the pot-fry in small batches.
5. The Double Dredge Technique
This how to make Guss fried chicken method relies on the double coating process: flour, egg wash, flour again. This creates multiple layers that trap air pockets, producing that iconic craggy, extra-crispy exterior. Press the flour firmly onto the chicken during each dredging to help it adhere. The 5-minute rest after coating allows the flour to absorb moisture from the egg wash, creating a slightly tacky surface that fries up incredibly crispy.
6. Don’t Rush the Resting Period
After frying, resist the temptation to serve immediately. Letting the chicken rest on a wire rack for 5–10 minutes allows excess oil to drain away and the crust to set properly, maintaining crispiness. Resting also allows the internal juices to redistribute throughout the meat, ensuring every bite is juicy. A wire rack is superior to paper towels because it allows air circulation underneath, preventing the bottom from getting soggy.
7. Season Aggressively at Every Stage
One secret behind the Gus’s world famous fried chicken recipe flavor is layered seasoning. You season the chicken itself after brining, then add the same seasonings to the flour coating. This ensures flavor throughout, not just on the surface. Don’t be shy-the seasoning mix should taste bold when you sample it. Remember that flavors mellow slightly during cooking, so what seems well-seasoned raw will taste perfectly balanced when fried.
Storage and Reheating Guidance
Store leftover fried chicken in an airtight container in the refrigerator for up to 3–4 days. For best results, reheat in a 375°F oven for 15–20 minutes on a wire rack until warmed through and crispy, avoiding the microwave which makes the coating soggy and rubbery.
Guss Fried Chicken Recipe
If you’ve ever tasted the legendary crunch of Gus’s World Famous Fried Chicken and wondered how to recreate that irresistible flavor at home, you’re in the right place. This copycat Guss fried chicken recipe delivers that signature golden-brown crust, juicy tender meat, and perfectly balanced seasoning that made the Memphis original a cult favorite.
Ingredients
- 8–10 pieces of chicken (drumsticks, thighs, wings, or mixed; about 3–4 lbs / 1.5–2 kg total)
- 8–10 pieces of chicken (drumsticks, thighs, wings, or mixed; about 3–4 lbs / 1.5–2 kg total)
- 2 cups (480 ml) buttermilk
- 2 cups (480 ml) buttermilk
- 1 medium yellow onion, sliced or roughly chopped
- 1 medium yellow onion, sliced or roughly chopped
- 3–4 garlic cloves, smashed or minced
- 3–4 garlic cloves, smashed or minced
- 1–2 tablespoons salt (kosher or table salt)
- 1–2 tablespoons salt (kosher or table salt)
- 2–3 tablespoons hot sauce (Frank’s RedHot or similar)
- 2–3 tablespoons hot sauce (Frank’s RedHot or similar)
- 1 teaspoon paprika
- 1 teaspoon paprika
- ½–1 teaspoon cayenne pepper
- ½–1 teaspoon cayenne pepper
- 1 teaspoon poultry seasoning
- 1 teaspoon poultry seasoning
- 1 teaspoon onion powder
- 1 teaspoon onion powder
- 1 teaspoon garlic powder
- 1 teaspoon garlic powder
- 1 teaspoon salt
- 1 teaspoon salt
- ½–1 teaspoon black pepper
- ½–1 teaspoon black pepper
- 2–3 cups self-rising flour
- 2–3 cups self-rising flour
- Same seasoning mix as above (duplicated for the coating)
- Same seasoning mix as above (duplicated for the coating)
- 1 large egg
- 1 large egg
- 3 tablespoons water
- 3 tablespoons water
- Neutral oil with high smoke point (vegetable, canola, or peanut oil; enough for 2–3 inches depth)
- Neutral oil with high smoke point (vegetable, canola, or peanut oil; enough for 2–3 inches depth)
Instructions
Step 1: Brine the Chicken
Place your chicken pieces in a large bowl or zip-top bag. Pour in the buttermilk, then add the sliced onion, smashed garlic cloves, salt, and hot sauce. Mix thoroughly to ensure every piece is coated. Cover and refrigerate for at least 4 hours, though overnight (up to 24 hours) yields maximum tenderness and flavor penetration.
Step 2: Remove and Dry
Take the chicken out of the buttermilk brine and discard the liquid along with the onion and garlic. Pat each piece completely dry with paper towels-removing moisture is critical for achieving that coveted crispy exterior. Let the chicken sit at room temperature for about 10 minutes to take the chill off.
Step 3: Season the Chicken
Combine paprika, cayenne pepper, poultry seasoning, onion powder, garlic powder, salt, and black pepper in a small bowl. Generously sprinkle and rub this seasoning blend all over each chicken piece, ensuring even coverage. Allow the seasoned chicken to rest at room temperature for another 10 minutes.
Step 4: Prepare the Dredging Station
Add self-rising flour to a large shallow dish and mix in the same seasoning blend you used on the chicken. Taste a small pinch to confirm it’s well-seasoned-it should be flavorful, not bland. In a separate bowl, whisk together the egg and water until completely smooth.
Step 5: Double Dredge for Maximum Crispiness
Dip one seasoned chicken piece into the egg wash, letting excess drip off. Immediately coat it thoroughly in the seasoned flour, pressing and squeezing the flour onto the chicken with your hands. For extra crunch, dip the floured piece back into the egg wash, then back into the flour, pressing firmly to create a thick, craggy coating. Place on a plate or rack and repeat with remaining pieces. Let rest for 5 minutes-the coating should look slightly wet and sticky.
Step 6: Heat the Oil
Pour oil into your deep pot or Dutch oven to a depth of 2–3 inches. Heat to exactly 350°F (175°C), monitoring with a thermometer. Maintaining this temperature is the secret to crispy fried chicken like Guss.
Step 7: Fry in Batches
Carefully lower chicken pieces into the hot oil without overcrowding-fry in batches if necessary. Cook drumsticks and wings for 12–15 minutes, thighs and breasts for 15–18 minutes, turning occasionally for even browning. The internal temperature should reach 165°F (74°C) in the thickest part.
Step 8: Drain and Rest
Remove finished pieces to a wire rack over a baking sheet (or paper towels) to drain. Let rest 5–10 minutes before serving to maintain maximum crispiness.
Notes
Store leftover fried chicken in an airtight container in the refrigerator for up to 3–4 days. For best results, reheat in a 375°F oven for 15–20 minutes on a wire rack until warmed through and crispy, avoiding the microwave which makes the coating soggy and rubbery.
Nutrition Information:
Yield:
5Serving Size:
1Amount Per Serving: Calories: 300
Common Queries and FAQs
Can I use chicken breasts instead of dark meat?
Absolutely! Chicken breasts work well in this Gus fried chicken recipe, though they require careful monitoring to avoid drying out. Cut large breasts in half horizontally to ensure even cooking. Fry for 15–18 minutes and use a thermometer to confirm they reach 165°F internal temperature. Dark meat (thighs, drumsticks) tends to stay juicier due to higher fat content, which is why many prefer it for frying.
What if I don’t have buttermilk?
Create a buttermilk substitute by adding 2 tablespoons of white vinegar or lemon juice to 2 cups of regular milk. Let it sit for 5–10 minutes until it curdles slightly, then use exactly as you would real buttermilk in this copycat gus’s fried chicken recipe. Plain yogurt thinned with milk also works as an alternative brine base.
Can I make this recipe without a deep fryer?
Yes! A heavy-bottomed Dutch oven or deep pot works perfectly for this crispy fried chicken recipe. The key is having enough oil depth (2–3 inches) and maintaining consistent temperature with a thermometer. Cast iron skillets also work well and provide excellent heat retention, though you’ll need to turn the chicken more frequently for even browning.
How do I know when the chicken is fully cooked?
The most reliable method is using an instant-read meat thermometer inserted into the thickest part of the chicken without touching bone. It should read 165°F (74°C). Visual cues include golden-brown color, clear (not pink) juices when pierced, and firm texture. The coating should be deeply golden and very crispy when properly cooked.
Can I prepare the chicken ahead of time?
Yes! You can complete the brining step up to 24 hours ahead. You can also season and dredge the chicken up to 2 hours before frying-keep coated pieces uncovered in the refrigerator, then let them come to room temperature for 15–20 minutes before frying. However, fried chicken is always best served fresh and hot for maximum crispiness.
What’s the best oil for frying this recipe?
Neutral oils with high smoke points work best for this Gus’s chicken recipe. Peanut oil (smoke point 450°F) is traditional and adds subtle nutty flavor. Vegetable oil and canola oil (both around 400°F smoke point) are economical, neutral-tasting alternatives. Avoid olive oil or butter, which have low smoke points and will burn at frying temperatures.
Why is my coating falling off during frying?
Coating separation usually happens when the chicken isn’t dried thoroughly after brining, the coating isn’t pressed firmly enough during dredging, or you skip the 5-minute rest after coating. Ensure you pat chicken completely dry, press the flour mixture firmly onto each piece, and allow the coating to hydrate and become tacky before frying. Also avoid moving the chicken too much during the first few minutes of frying-let it set before turning.
This Guss fried chicken recipe brings the legendary Memphis flavor straight to your home kitchen with results that rival the original. By mastering the buttermilk brine, double-dredge technique, and precise frying temperature, you’ll achieve that perfect combination of ultra-crispy exterior and juicy, flavorful meat every single time.
Whether you’re recreating childhood memories, impressing dinner guests, or simply satisfying a serious fried chicken craving, this best fried chicken recipe delivers restaurant-quality results with straightforward techniques any home cook can master. The layered seasoning, self-rising flour secret, and attention to detail make all the difference between good fried chicken and truly unforgettable fried chicken that’ll have everyone asking for your recipe.
We’d love to hear how this recipe turns out for you! Give it a try, then drop a comment below to share your thoughts and tips with us.
You can also follow us on Pinterest, and YouTube for more delicious updates and kitchen inspiration. Your feedback and support mean the world to us!
1 comment