

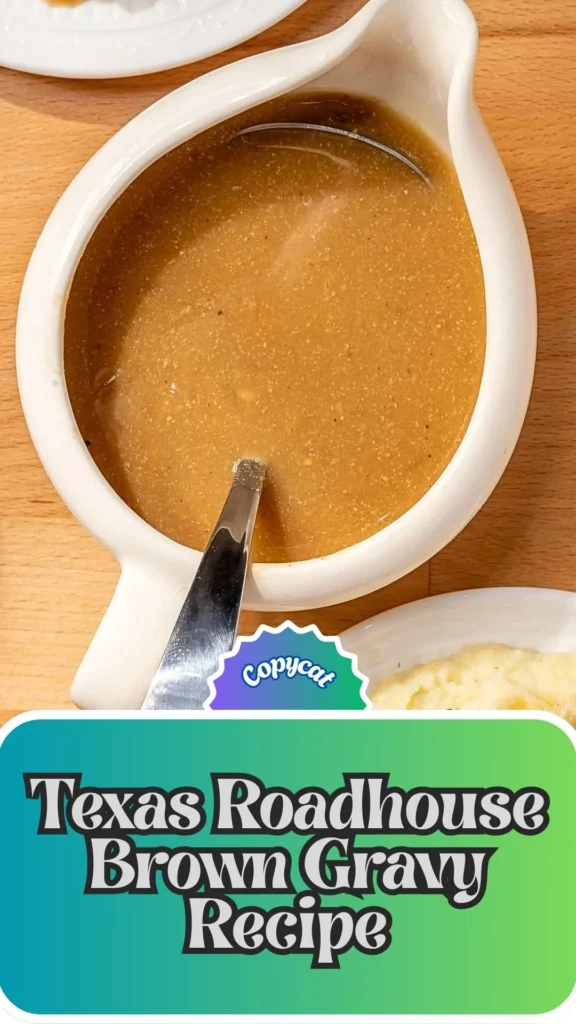
If you’ve ever enjoyed a hearty meal at Texas Roadhouse, you know their rich, savory brown gravy is the perfect finishing touch to mashed potatoes, chicken fried steak, or hot dinner rolls.
This copycat Texas Roadhouse brown gravy recipe brings that beloved restaurant flavor straight to your kitchen with simple pantry ingredients and easy techniques. Making brown gravy from scratch might seem intimidating, but this Texas Roadhouse gravy recipe proves that creating a velvety, flavorful sauce is surprisingly simple.
Whether you’re craving that signature taste or looking to elevate your weeknight dinners, this homemade version delivers authentic steakhouse quality without leaving your home.
What Does Texas Roadhouse Brown Gravy Taste Like?
This Texas Roadhouse gravy offers a beautifully balanced flavor profile that’s both comforting and sophisticated. The savory base comes from a perfectly browned roux combined with chicken bouillon, creating deep umami notes that coat your palate.

You’ll detect subtle sweetness from caramelized onions, while Worcestershire sauce adds tangy complexity and a hint of fermented richness. The herbaceous undertones of thyme and optional basil provide an aromatic quality without overwhelming the gravy’s meaty essence.
Black pepper delivers a gentle warmth, and the silky texture clings beautifully to whatever you’re serving, making every bite luxuriously satisfying.
Texas Roadhouse Brown Gravy Recipe Ingredientss
Ingredients
Fat Base:
- 2 tablespoons oil
- 2 tablespoons butter
Aromatics:
- ¼ medium yellow onion, thinly sliced
Roux:
- 3 tablespoons all-purpose flour
Liquid:
- 1½ to 2 cups water (added gradually)
Seasonings:
- 1 teaspoon chicken bouillon (or beef bouillon)
- 1 teaspoon Worcestershire sauce
- ½ teaspoon dried thyme (or ground thyme)
- ½ teaspoon black pepper
- ¼ teaspoon garlic powder (optional)
- ¼ teaspoon paprika (optional, for color)
- ¼ teaspoon onion powder (optional)
- ¼ teaspoon dried basil (optional)
Kitchen Utensils
- Large skillet (preferably 10-12 inch)
- Whisk
- Wooden spoon or spatula
- Measuring spoons
- Measuring cup
- Fine-mesh strainer (optional, for smooth gravy)
Preparation and Cooking Time
Prep Time: 5 minutes
Cook Time: 12-15 minutes
Total Time: 17-20 minutes
Servings: 4-6 servings (approximately 1½ to 2 cups)
Texas Roadhouse Brown Gravy Recipe Instructions
Step 1: Heat the Skillet
Place a large skillet over high heat. Add the oil and butter to the pan. Let the butter melt completely, swirling occasionally to combine with the oil. This fat combination creates the ideal base for your roux.
Step 2: Cook the Onions
Add the thinly sliced onions to the melted butter and oil. Cook until they become soft and translucent, stirring occasionally to prevent sticking. This process takes about 3-4 minutes and builds the foundational sweetness.
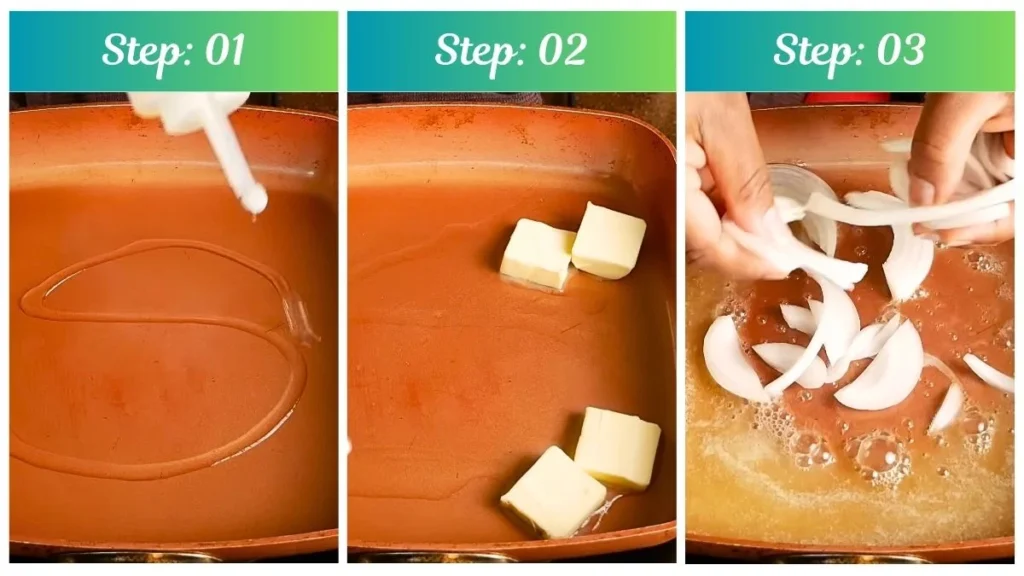
Step 3: Make the Roux
Sprinkle the flour evenly over the cooked onions-avoid dumping it all in one spot to prevent clumping. Immediately begin whisking continuously to combine the flour with the fat and onions. Keep the heat at medium-high and stir constantly to prevent burning. Cook the roux until the mixture turns a rich golden brown color, which may take 3-5 minutes. Be patient during this crucial step, as the browning develops deep flavor.
Step 4: Season the Base
Add the chicken bouillon directly to the browned roux and mix well with your whisk. The bouillon will begin dissolving as you incorporate the liquid.
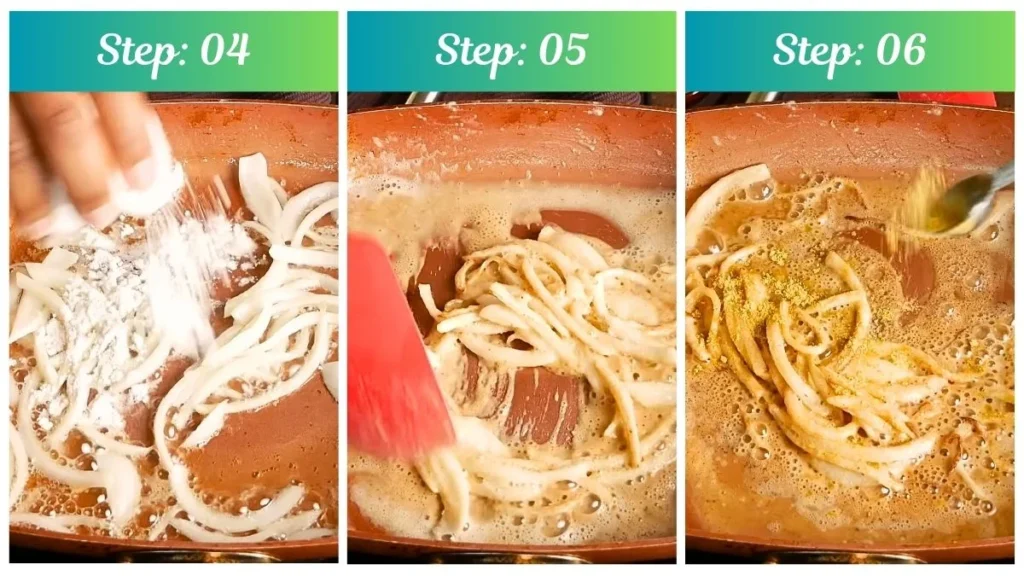
Step 5: Add Water Gradually
Pour in a small amount of water (about ¼ cup) and whisk vigorously until smooth. Continue adding water little by little, whisking constantly after each addition to avoid lumps. Add a total of 1½ to 2 cups of water, depending on your desired consistency. Keep the gravy slightly thinner at this stage, as it will naturally thicken as it sits and cools.
Step 6: Add Seasoning
Stir in the Worcestershire sauce, thyme, and black pepper. If using optional seasonings, add the garlic powder, paprika, and onion powder at this point. Mix everything well and let the gravy simmer for 2-3 minutes, allowing the flavors to meld together.
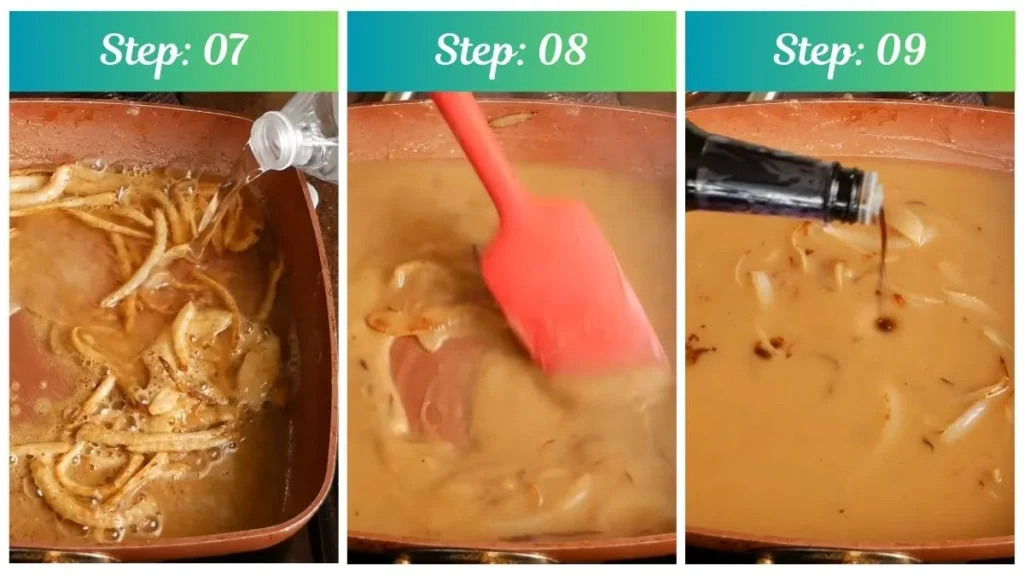
Step 7: Adjust Consistency
Observe the gravy’s thickness as it simmers. If it becomes too thick for your preference, add a little more water (a tablespoon at a time) and stir until you achieve the desired consistency.
Step 8: Final Touch
Add the dried basil if using. Taste the gravy and adjust the seasoning as needed-you might want more pepper, salt, or Worcestershire sauce depending on your preference.
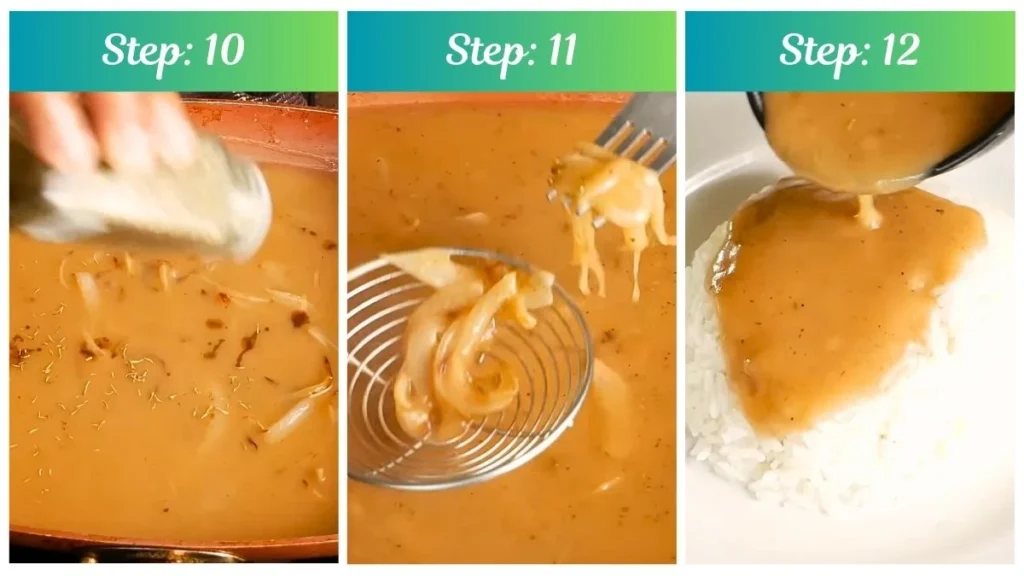
Step 9: Optional Step
For a completely smooth Texas Roadhouse-style gravy, use a fine-mesh strainer to remove the onion pieces. Alternatively, leave the tender onions in for added texture and flavor depth.
Customization and Pairing Ideas for Serving
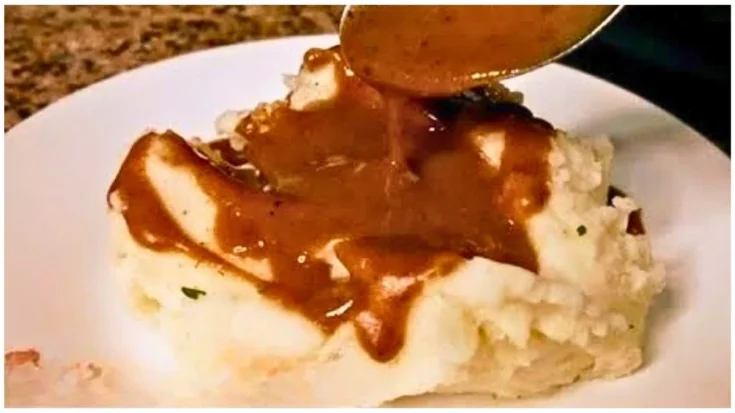
1. Classic Mashed Potato Companion
The most iconic pairing is ladling this Texas Roadhouse brown gravy generously over creamy mashed potatoes. The velvety texture complements fluffy or buttery potatoes perfectly, creating the ultimate comfort food combination that mimics the steakhouse experience at home.
2. Chicken Fried Steak Topping
Transform ordinary breaded cutlets into a restaurant-worthy entrée by smothering chicken fried steak or country fried chicken with this savory gravy. The richness cuts through the crispy coating while adding moisture and depth to every bite.
3. Biscuits and Gravy Breakfast
Turn this recipe into a hearty breakfast or brunch dish by serving it over warm, flaky buttermilk biscuits. The gravy soaks into the biscuit layers, creating a Southern-style morning meal that’s indulgent and satisfying.
4. Beef Customization
Swap the chicken bouillon for beef bouillon to create a richer, more robust brown gravy that pairs exceptionally well with roast beef, meatloaf, or beef pot roast. This variation enhances the meaty undertones and works beautifully with red meat dishes.
5. Vegetable Medley Enhancement
Pour this gravy over roasted or steamed vegetables like green beans, carrots, or Brussels sprouts to make them more appealing, especially for picky eaters. The savory coating transforms simple vegetables into a side dish everyone will enjoy.
6. Hot Open-Faced Sandwich Base
Create a classic hot turkey or roast beef sandwich by layering sliced meat over white bread and drowning it in this homemade brown gravy. Add mashed potatoes on the side for a complete, diner-style comfort meal.
7. Poutine-Inspired Creation
Give this recipe an international twist by using it as a gravy base for poutine. Pour the hot Texas Roadhouse gravy over crispy french fries and cheese curds, allowing the heat to melt the cheese into a decadent, cross-cultural dish that combines American steakhouse flavors with Canadian comfort food tradition.
Essential Tips for Perfect Texas Roadhouse Gravy Recipe
1. Don’t Rush the Roux
The browning process is critical for developing the signature flavor of this Texas Roadhouse brown gravy recipe. Resist the temptation to increase heat excessively or skip the browning step. A properly browned roux should smell nutty and appear golden to light brown. This usually takes 3-5 minutes of constant stirring, but the depth of flavor it creates is worth every second of attention.
2. Control Your Heat Carefully
Start with high heat to melt the butter and oil, then reduce to medium-high once you add the flour. If the heat is too high during the roux stage, you risk burning the flour, which will give your gravy a bitter, unpleasant taste. If you notice dark specks or smell anything acrid, it’s better to start over than to continue with burned roux.
3. Add Water Temperature Matters
While room temperature water works fine, slightly warm water incorporates more smoothly into the roux and reduces the risk of lumps forming. Cold water can cause the hot roux to seize up temporarily, making whisking more difficult. If you only have cold water available, just add it even more gradually and whisk more vigorously.
4. Whisk Constantly During Water Addition
Lumpy gravy is the most common complaint when making brown gravy from scratch. The secret to silky-smooth texture is continuous, energetic whisking as you add each portion of water. Don’t stop whisking until each addition is fully incorporated before adding more liquid. Your arm might get tired, but the smooth result is worth it.
5. Bouillon Intensity Varies by Brand
Different chicken bouillon brands have varying salt levels and flavor intensity. Start with the recommended 1 teaspoon, then taste before adding additional salt. Better Than Bouillon, bouillon cubes, and granulated bouillon all work, but you may need to adjust quantities. If using cubes, crush them thoroughly before adding to ensure they dissolve completely.
6. Strain for Restaurant Smoothness
While the caramelized onions add wonderful flavor, Texas Roadhouse serves their gravy completely smooth. If you’re aiming for authentic copycat perfection, strain the gravy through a fine-mesh sieve after cooking. Press the onions with a spoon to extract all their flavorful juices before discarding them. For a compromise, you can finely mince the onions before cooking so they almost disappear into the gravy.
7. Make Ahead and Consistency Management
This Texas Roadhouse gravy recipe thickens considerably as it cools, which is normal for any flour-based sauce. When making it ahead, intentionally keep it slightly thinner than your target consistency. During reheating, add water or broth one tablespoon at a time while whisking to return it to the perfect pourable texture. The gravy can be refrigerated for up to 4 days, making it convenient for meal prep or holiday cooking when you want to prepare components in advance.
Storage and Reheating Guidance
Store leftover Texas Roadhouse brown gravy in an airtight container in the refrigerator for up to 4 days. Reheat gently on the stovetop over medium-low heat, whisking frequently and adding water or broth as needed to restore the smooth consistency, as the gravy will thicken when cold.
Texas Roadhouse Brown Gravy Recipe
If you’ve ever enjoyed a hearty meal at Texas Roadhouse, you know their rich, savory brown gravy is the perfect finishing touch to mashed potatoes, chicken fried steak, or hot dinner rolls.
Ingredients
- 2 tablespoons oil
- 2 tablespoons butter
- ¼ medium yellow onion, thinly sliced
- 3 tablespoons all-purpose flour
- 1½ to 2 cups water
- 1 teaspoon chicken bouillon
- 1 teaspoon Worcestershire sauce
- ½ teaspoon dried thyme
- ½ teaspoon black pepper
- ¼ teaspoon garlic powder
- ¼ teaspoon paprika
- ¼ teaspoon onion powder
- ¼ teaspoon dried basil
Instructions
Step 1: Heat the Skillet
Place a large skillet over high heat. Add the oil and butter to the pan. Let the butter melt completely, swirling occasionally to combine with the oil. This fat combination creates the ideal base for your roux.
Step 2: Cook the Onions
Add the thinly sliced onions to the melted butter and oil. Cook until they become soft and translucent, stirring occasionally to prevent sticking. This process takes about 3-4 minutes and builds the foundational sweetness.
Step 3: Make the Roux
Sprinkle the flour evenly over the cooked onions-avoid dumping it all in one spot to prevent clumping. Immediately begin whisking continuously to combine the flour with the fat and onions. Keep the heat at medium-high and stir constantly to prevent burning. Cook the roux until the mixture turns a rich golden brown color, which may take 3-5 minutes. Be patient during this crucial step, as the browning develops deep flavor.
Step 4: Season the Base
Add the chicken bouillon directly to the browned roux and mix well with your whisk. The bouillon will begin dissolving as you incorporate the liquid.
Step 5: Add Water Gradually
Pour in a small amount of water (about ¼ cup) and whisk vigorously until smooth. Continue adding water little by little, whisking constantly after each addition to avoid lumps. Add a total of 1½ to 2 cups of water, depending on your desired consistency. Keep the gravy slightly thinner at this stage, as it will naturally thicken as it sits and cools.
Step 6: Add Seasoning
Stir in the Worcestershire sauce, thyme, and black pepper. If using optional seasonings, add the garlic powder, paprika, and onion powder at this point. Mix everything well and let the gravy simmer for 2-3 minutes, allowing the flavors to meld together.
Step 7: Adjust Consistency
Observe the gravy’s thickness as it simmers. If it becomes too thick for your preference, add a little more water (a tablespoon at a time) and stir until you achieve the desired consistency.
Step 8: Final Touch
Add the dried basil if using. Taste the gravy and adjust the seasoning as needed-you might want more pepper, salt, or Worcestershire sauce depending on your preference.
Step 9: Optional Step
For a completely smooth Texas Roadhouse-style gravy, use a fine-mesh strainer to remove the onion pieces. Alternatively, leave the tender onions in for added texture and flavor depth.
Notes
Store leftover Texas Roadhouse brown gravy in an airtight container in the refrigerator for up to 4 days. Reheat gently on the stovetop over medium-low heat, whisking frequently and adding water or broth as needed to restore the smooth consistency, as the gravy will thicken when cold.
Nutrition Information:
Yield:
6Serving Size:
1Amount Per Serving: Calories: 70
Common Queries and FAQs
When you give this Texas Roadhouse Brown Gravy Recipe a try, you might have a few questions. Don’t worry-we’ve rounded up answers to the most common ones to help you out.
Can I use beef bouillon instead of chicken bouillon in this Texas Roadhouse gravy recipe?
Absolutely! Beef bouillon creates a richer, more robust flavor that pairs exceptionally well with beef dishes like pot roast or steak. The chicken bouillon provides a lighter, more versatile base that works with poultry, pork, and vegetables. Choose based on what you’re serving.
Why is my brown gravy lumpy?
Lumps form when flour clumps aren’t properly dispersed during the roux stage or when water is added too quickly. To fix lumpy gravy, pour it through a fine-mesh strainer or use an immersion blender. To prevent lumps, sprinkle flour evenly over the pan, whisk continuously, and add water gradually while maintaining constant whisking motion.
How can I make this copycat Texas Roadhouse brown gravy thicker?
If your gravy is too thin, create a slurry by mixing 1 tablespoon of flour with 2 tablespoons of cold water until smooth. Whisk this into the simmering gravy and cook for 2-3 additional minutes until thickened. Alternatively, simply simmer the gravy longer to allow excess water to evaporate naturally.
Can I freeze Texas Roadhouse brown gravy?
Yes, this gravy freezes well for up to 3 months. Cool it completely, then store in freezer-safe containers or bags, leaving some headspace for expansion. Thaw overnight in the refrigerator and reheat on the stovetop, whisking in water to restore the proper consistency since flour-based gravies often separate slightly during freezing.
What can I substitute for Worcestershire sauce?
If you don’t have Worcestershire sauce, use soy sauce for umami depth (start with ½ teaspoon as it’s saltier), or combine equal parts balsamic vinegar and soy sauce. In a pinch, a splash of beef broth with a tiny bit of molasses can approximate the tangy, savory complexity.
How do I make this gravy gluten-free?
Replace the all-purpose flour with a gluten-free flour blend or cornstarch. If using cornstarch, you’ll need less (about 2 tablespoons) and should create a slurry with cold water before adding it to avoid clumping. The texture will be slightly different but still delicious.
Why does my Texas Roadhouse gravy taste bland?
The most common culprit is insufficient browning of the roux or under seasoning. Make sure to cook the flour mixture until it’s golden brown and aromatic. Don’t forget to taste and adjust-you may need additional black pepper, bouillon, Worcestershire sauce, or even a pinch of salt depending on your bouillon’s saltiness.
This copycat Texas Roadhouse brown gravy recipe proves that restaurant-quality flavor is completely achievable in your home kitchen with basic ingredients and simple techniques. The combination of a properly browned roux, aromatic onions, and balanced seasonings creates a versatile sauce that elevates everything from weeknight mashed potatoes to holiday turkey dinners.
Making brown gravy from scratch gives you complete control over flavor and consistency while costing a fraction of store-bought options. Once you master this Texas Roadhouse gravy, you’ll never settle for packet gravy again-and your family will be requesting it at every meal!
We’d love to hear how this recipe turns out for you! Give it a try, then drop a comment below to share your thoughts and tips with us. You can also follow us on Pinterest, and YouTube for more delicious updates and kitchen inspiration. Your feedback and support mean the world to us!